A plastic model of the funny robot ED-209 from the movie "ROBOCOP".
It is an accurate and realistic kit made by Good Smile Company (released in February 2021 in Japan). I like the movie, so I tried to improve the details of the model referring to the movie (DVD). This article shows how I worked on the model.
This article is written both in English and in Japanese. The contents are almost the same in both languages.
As for painting, the official blog of the Good Smile Company offers an instructive guide (in Japanese language).
今年発売された「ED-209」のプラモデル制作記事です。原作映画もわりと好きな作品ですし、なかなか貴重なキットなので、映画を参照しながらディテールアップしてみました。
せっかくなので、海外の閲覧者向けに英語と日本語で併記していきます。
なお、塗装に関しては、GSC公式ブログの記事が、成形色仕上げのハウツーや塗装色見本などを紹介しています。
【 paints (塗料) 】
Basically I used lacquer paints from Creos (Mr. Color). The color recipe I used is:
- frame and joints: flat black with dry brushing by Tamiya's Gun Metal.
- armor: barley gray BS4800 / 18B21 (Mr. Color #334).
- lower shank armor: light gray.
- silver: Gun chrome (Mr. Color #104).
- accordion covers: tire black.
- cartridges: field gray with a little silver. / aqueous paint Citadel 'Iron Warriors'.
- rivets: Heavy Gun Metal (from Gundam Marker).
- weathering / filtering: dark gray with a little black (Tamiya's enamel paint).
- weathering for guns: clear orange plus a little flat black (Tamiya's enamel paint).
- Cables at the upper surface: gloss black (aqueous paint from Creos).
- Nuts (gold): 'Retributor Armour' (from Citadel's aqueous paint).
塗料は、基本的にCreosのラッカー塗料を使った。今回の塗装レシピは:
- フレーム:フラットブラック(+Tamiyaガンメタルでドライブラシ)
- 装甲:バーリーグレー(成形色よりも落ち着いた色合い)
- 脛下部の装甲: ライトグレー(ここはたぶん通常装甲とは別の色)
- シルバー部分:ガンクローム(光沢が美しい)
- 蛇腹部分:タイヤブラック
- 弾倉など:フィールドグレー(+シルバー少量)、またはシタデル「Iron Warriors」
- リベット:ガンダムマーカー「ヘビーガンメタリック」(金属的な輝きが素晴らしい)
- ウェザリング:ダークグレー(+フラットブラック少量):Tamiyaエナメル
- 銃身等:クリアオレンジ(+フラットブラック少量):Tamiyaエナメル
- 上面のケーブル:グロスブラック(水性塗料)
- 六角ナット(ゴールド):シタデル「Retributor Armour」
【 Outline (全体) 】
高さは約20cm。1/10~1/12に相当すると思われる。各部のリベットは特徴的なので、塗り分けて強調してやりたい。
The front view of ED-209. I painted the armor with 'Barley Gray BS4800 / 18B21' from Creos. I like this color.
正面から。装甲部分はCreosのバーリーグレー(#334)で塗装した。成形色よりも彩度が低くて、ロボットらしいクールな落ち着きがある。個人的にもこの色は好みで、艦船模型でも使っている。
The side view. The knee joints are bent to the inverse direction, which is a prominent feature of this robot.
側面から。膝の逆関節は、メッシュ頭部や両腕の武装と並んで、このロボの大きな特徴。膝は原作同様に伸縮可動する。
Rear view. We can see the rugged legs like a heavy machinery from this angle. Some joints has ratchet mechanism.
背面から。この角度で見ると、重機的な武骨さを楽しめる。腹部、股関節、足首の関節はラチェット機構でカチカチと可動する。As is seen in the movie, the model can slide and lengthen the legs (the head goes up to 26 cm high), but it becomes so unstable, as you may know. The cartridge holders on the forearms don't move as it did in the movie. I suppose it is easy to add in the mechanism that the cartridges can move up and down.
脚部を最大限伸ばすと、左記写真のようになる。高さは約26cmにまで伸び上がるが、そのぶん不安定になり、ひっくり返りやすくなる。可動について言うと、両腕のミサイルポッドは非可動で、原作のように上下動はしない。ただし、可動を仕込むのは比較的容易だろう。
【 Improving its body (胴体部分の改修) 】
口の中の造形はよく分からないが、映画を見るかぎりではだいたいこんな感じのようだ。市販の適当なコードや金属線を曲げたものなどを組み込んだ。
Some rivets are omitted or inaccurately shaped because of the constraints of molding. I watched the movie again and tried to reproduce the details as faithfully as possible.
金型の都合でリベット等が省略されている箇所がある。特に肩口は目立つ場所なので、作り直しておいた。The top view. I made holes of 2 mm in diameter with a pin vise, and put 1.5 mm short pipes in them.
ここにもリベットがある。ピンバイスで2mm穴を空けて、ハイキューパーツの「ツインパイプ2」(1.5mm)を埋め込みまくる。40個以上使った。
Inside the body is rather hollow, that is, the head is not so heavy. It is not likely to overturn, unlike in the movie.
胴体の内側は空いている。おかげでトップヘビーが避けられており、転倒しにくくなっている。転倒してこそのED-209ではあるが。There are also some shortage of the rivets, though the ordinary viewers won't be aware of the difference.
背面側も、原作映画の造形を見ながらリベット表現を追加していく。The back side. I owe a lot to HiQ Parts, which sells various kinds of turned metal items of the highest quality, including small pipes.
このあたりもいくつか。ハイキューの金属パイプはハイクオリティな旋盤加工品だが値段も掛かるので、Kotobukiyaのプラ製リベットパーツなどを使う方が安価に済む。I could recognize some plates or square dints around the hip. I attached small plates with a decal from an aircraft model.
よく分からないので、プレートがあると解釈して、Hasegawaの鏡面シートを貼り付けて済ませた。文字らしきものは、適当な航空機模型のデカールから流用。
Under the shoulder armor, I added some parts from other kits.
両肩装甲の裏側はスカスカ。ほとんど見えない部分なので無加工のままでも良いが、適当な余剰パーツでそれらしくした(※映画では、ED-209が階段で転倒した時に、ちょっとだけ見える)。
【 Improvement of arms (腕部の改修) 】
キット同梱のコードはやや太いので、市販のLED用極細コードをバラして流用した。精密感アップ。
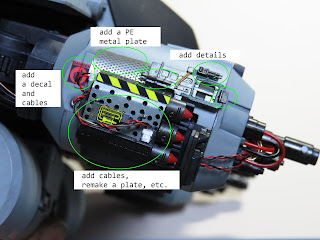
I added some parts around the missile platform on the right arm. I used the thin cables here, too. And I put a photo-etched metal plate.
ミサイルポッドは見せどころなので、映画を参考にしつついろいろ手を加えた。コードを這わせるだけでもかなり雰囲気が変わる。Rocket launcher is a high spot of this model. I attached a decal from an aircraft model, though it had German words...
航空機模型のデカールは、cautionマークなどの極小文字列が入手できるので便利。ただし、今回は適当なものが無かったのでドイツ語になってしまった。It seems there are accordion covers at the upper arms in the movie, but I gave up reproducing them this time.
上腕にも蛇腹カバーが存在するように見えるが、今回は再現を省略した。スペースが狭すぎるし、ここはカバーとして意味が乏しいように思えたので。
【 Improving the legs (脚部の改修) 】
脚部は、重機のようなごつい感じをできるだけ再現するようにした。六角ナットはKotobukiyaのパーツ。ゴールドに塗装したら、ちょうど良いワンポイントのアイキャッチになった。
Outside and inside of the legs have some different details.
原作映画を見ると、脚部は外側と内側で微妙に異なっている膝下の蛇腹パーツは、合わせ目隠しにもなる。
The back of the knee. I replaced some columnar figures of the kit with hex nuts from Kotobukiya.
膝の裏側にもリベットらしき造形が入っているのだが、幅が狭くて大きな穴を開けるのが難しかったので、ただの穴だけにした。六角ナットはKotobukiya製。Referring to the movie, I painted to change the colors of some parts from those of the kit.
映画を参考にして、左図のように塗り分けを追加した。色が増えて、見た目の面白味が増したと思う。
I used a pin vise for making or digging small holes on the kit.
ここもピンバイスで穴を彫った。
Around the ankles and insteps, there are exciting expressions of cables and other equipment, which we can glance at when ED-209 is trying to descend the stairs in the movie.
足首は見どころ。映画を参考にしたが、細部は分からないので、適当にコードを張り巡らせた。
Because I had little information about the figuration, I laid out the cables freely and arbitrarily. Surplus parts from 1/700 ship models are useful for such a minute decorating.
市販のコードのほか、1/700艦船模型の余剰パーツを適当に置いてある(今回はPit-Road「クリーブランド」)。
Rear view of the foot. The kit itself expresses some cables by molding, but they are not stereoscopic enough. I recommend to attach elastic cords by yourself.
かかと側。キットそれ自体にもケーブル状のモールドがあるが、塗り分けるのは大変なのでコードを追加してしまう方が簡単だし効果的だろう。I could find some rivets here in the movie, but I gave up making them because I was not sure about the strength of its inner structure.
映画を見ると、かかと側にもリベットがたくさん入っているのだが、スペースが無いのと、内部構造に干渉する危険があったので、今回は無視した。The bottoms of ED-209's feet are seen when Murphy finally defeated it in front of the Omni's building.
足の裏。映像を見ると、かかと側はこのような形状になっている(※映画の終盤で、マーフィーに撃破されてひっくり返ったシーンで確認できる)。
【 Structures of the kit (パーツや構造について) 】
頭部のメッシュパーツは、スライド金型でワンパーツ成型。素材面でも金属シャフト、スプリング、樹脂コード、POMパーツまで使われている。
The joint between the shoulder and upper arm has a stopper structure. For other joints, the kit contains five pre-assembled strong joint parts.
肩の接続部には簡単なストッパー機構がある。気の利いた配慮。また、組立済みの頑丈なジョイントも各部に使われている。
This ED-209 kit can move its shoulder below at almost 90 degrees.
両肩は、真下にほぼ90度まで下げられる。
The pack of the kit is very large (almost twice as ordinary AFV kits), though its price is only 8,091 yen. The MODEROID series features various kinds of attractive characters.
箱はこんな感じ。大きさの割に十分リーズナブルだと思う。MODEROIDシリーズの挑戦的なラインアップは、今後とも応援していきたい。Together with another inverse knee joint robot: 'Rayleonard 04-Alicia Unsung' from the video game "Armored Core" (a plastic model kit from Kotobukiya).
逆関節プラモどうし、Kotobukiyaの「アリシア アンサング」と並べてみた。
Together with a doll, a figure, and a plastic model of about 1/12 scale. Seemingly almost the same scale.
1/12スケールの立体物と並べて。左からAzoneのドール(カスタムリリィ)、完成品フィギュア(figma)、そしてプラモデル(ハン・ソロ)。スケール感はこのあたりかな。
Comparing with 1/8 scale characters from Bandai ("Tiger and Bunny").
1/8スケールのTiger and Bunnyコンビは、23~24cmの大迫力。この二人と並べると、ED-209くん、負けそう……。


